Cad 3D Category

Showing posts with label Additive Manufacturing. Show all posts

Mastering Your ELEGOO 3D Printer: Transform Your Creative Vision in 3D Space

Wednesday, November 11, 2026
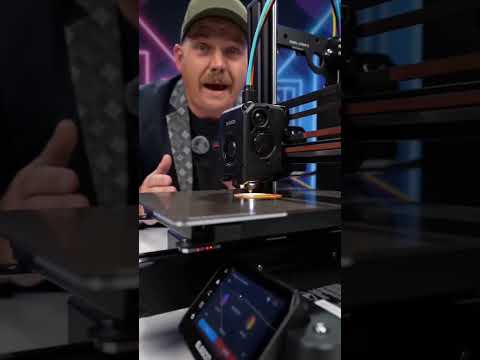
3D printing has revolutionized how makers, engineers, and hobbyists turn digital concepts into tangible reality. The ELEGOO series—especially high-performance machines like the Centaur Carbon—offers incredible precision, speed, and versatility. Whether you are a beginner taking your first steps or a seasoned creator looking to refine your workflow, mastering your machine is the secret to seamlessly translating digital models into physical 3D space.

In this guide, we will explore essential tips and tricks to help you get the best possible results from your ELEGOO 3D printer.

Perfecting Bed Leveling and Calibration

A flawless print always begins with a solid first layer. Proper bed leveling ensures optimal filament adhesion, preventing frustrating issues such as warping, stringing, or models detaching mid-print. Take the time to carefully level your build plate and fine-tune your Z-offset. When your printer nozzle moves accurately across the 3D space of the print bed, your models achieve maximum structural integrity right from the start.

Optimizing Slicer Settings for Maximum Precision

Your slicer software acts as the critical bridge between your 3D model and the printer hardware. Fine-tuning key parameters—such as layer height, print speed, and retraction distance—dramatically elevates your output quality. For intricate designs with steep overhangs, configuring custom support structures ensures stability while occupying minimal volume in the 3D space. Don't hesitate to experiment with different infill patterns to strike the perfect balance between part strength and material conservation.

Maintenance and Care for Long-Term Performance

High-precision 3D printers require regular upkeep to maintain peak performance. Keep your lead screws properly lubricated, inspect belt tension periodically, and clean the nozzle to prevent filament clogs. Routine care guarantees that every movement of the print head remains smooth and accurate, resulting in cleaner surface finishes and tighter dimensional tolerances.

Conclusion

Unlocking the full potential of your ELEGOO 3D printer comes down to mastering the fundamentals: accurate calibration, tailored slicer profiles, and consistent machine care. By applying these tips, you can elevate your print quality and confidently bring even your most ambitious projects to life.

Continue Reading | ความคิดเห็น

Bringing Your 3D Asset to Life: How 3D Printers Build Objects Layer by Layer

Monday, November 9, 2026

Have you ever wondered how a machine can construct a physical, tangible object seemingly out of thin air? To the untrained eye, 3D printing looks like pure science fiction—converting computer code into solid plastic, metal, or resin items. However, beneath this seemingly magical process lies a fascinating technology known as additive manufacturing.

It All Starts with a Digital Blueprint

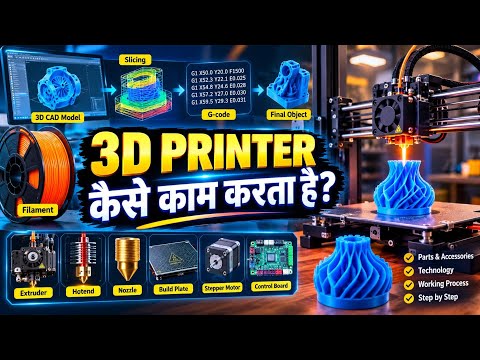
Before a 3D printer can lay down a single layer of material, it requires precise digital instructions. Every physical print begins as a digital 3D asset created using Computer-Aided Design (CAD) software, 3D modeling programs, or spatial 3D scanning technology. This digital file acts as the ultimate master blueprint, defining the exact geometry, dimensions, and structural characteristics of the intended object.

Slicing the Virtual Model into Instructions

Once the high-quality 3D asset is prepared, it is imported into specialized software called a "slicer." The slicing program translates the complex 3D shape into hundreds—or sometimes thousands—of microscopic, flat horizontal layers. It converts the visual model into G-code, a machine readable language that tells the printer precisely where to move, how fast to travel, and how much material to deposit at any given coordinate.

Layer by Layer: The Additive Magic

Unlike traditional subtractive manufacturing, which carves an object out of a solid block of raw material, 3D printing creates items incrementally from the ground up. Depending on the specific technology used: - FDM (Fused Deposition Modeling): Melts thermoplastic filament and extrudes it through a fine nozzle. - SLA (Stereolithography): Uses a UV laser to selectively cure layers of liquid resin into hardened plastic. - SLS (Selective Laser Sintering): Fuses powdered materials together using a targeted laser beam.

As each ultra-thin layer is laid down, it instantly fuses to the layer beneath it. Layer upon layer, the printer gradually builds up the physical structure until the complete object emerges.

The Future of Creation

From rapid prototyping and custom medical implants to aerospace components, turning a virtual 3D asset into a physical reality is revolutionizing how we invent, design, and manufacture products. By reducing material waste and enabling intricate geometric designs that traditional tools cannot replicate, 3D printing continues to reshape our physical world.

Continue Reading | ความคิดเห็น

The History of 3D Printing: What Was the World's Very First Print?

Sunday, November 8, 2026

Today, technology allows us to fabricate everything from custom medical prosthetics to intricate aerospace components right before our eyes. However, the revolutionary journey of 3D printing didn't start in a futuristic lab equipped with supercomputers—it began decades ago with a simple idea, a bit of ultraviolet light, and one visionary engineer.

The Engineer Who Changed Everything

In the early 1980s, American engineer Chuck Hull was frustrated by how long traditional manufacturing methods took to create small plastic prototypes. Seeking a faster solution, he envisioned a process where liquid photopolymer resin could be cured layer-by-layer using an ultraviolet laser.

By 1983, Hull successfully developed stereolithography (SLA), the foundational technique that officially birthed modern 3D printing. Shortly after, he patented the process and co-founded 3D Systems, kicking off a brand-new era of additive manufacturing.

What Was the World’s First 3D Print?

You might wonder what historic object emerged from the very first successful test. Was it a complex mechanical gear, a specialized tool, or a miniature prototype?

Surprisingly, the world’s first printed object was a modest plastic eye-wash cup. After spending long nights refining his apparatus, Chuck Hull used his new SLA machine to produce a small, hollow vessel designed for eye irrigation. Though simple in appearance, that tiny cup proved that turning digital computer data into physical, three-dimensional objects was no longer science fiction—it was reality.

From a Small Cup to a Global Revolution

Chuck Hull’s pioneering moment forever changed how human beings design and build things. From that single liquid-cured cup, 3D printing has expanded into a multibillion-dollar global industry spanning healthcare, automotive design, architecture, and space exploration.

Next time you see a printer layering material to create a complex object, remember the humble blue eye-wash cup that started it all!

Continue Reading | ความคิดเห็น

Mastering Filament Storage: Essential Tips for 3D Engineering Success

Friday, October 30, 2026

If you want consistent, high-quality prints, knowing how to properly store your 3D printer filament is just as important as mastering your machine's settings. In the fast-evolving world of 3D engineering, high-precision output requires pristine raw materials. Exposed filament absorbs moisture from the surrounding air, leading to poor layer adhesion, stringing, nozzle clogs, and brittle final parts.

Why Moisture Control Matters

Most standard 3D printing filaments—such as PLA, ABS, PETG, and especially Nylon—are hygroscopic. This means they actively draw water molecules from ambient air. When damp filament hits the hot end, trapped water turns to steam, causing crackling sounds, bubbling, uneven extrusion, and weak structural performance. In demanding 3D engineering workflows, these material defects can completely compromise functional prototypes and end-use components.

Effective Methods for Storing Your Filament

To protect your materials and ensure reliable print quality, consider integrating these practical storage solutions into your workspace:

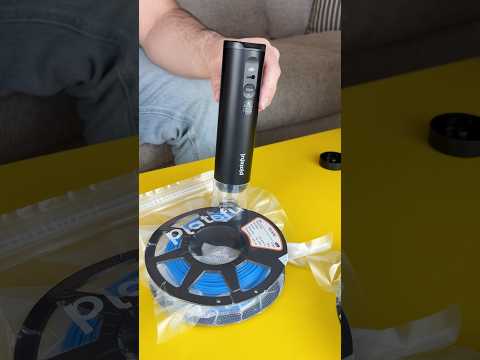
  1. Vacuum Bags with Desiccant Packs: This is one of the most cost-effective methods. Storing spools in airtight vacuum bags with silica gel packets actively removes residual moisture and keeps humidity at bay.
  2. Airtight Storage Bins: Heavy-duty plastic containers fitted with rubber gaskets create a controlled, moisture-proof environment for multiple spools. Place a rechargeable desiccant or a digital hygrometer inside to monitor internal humidity levels easily.
  3. Active Filament Dry Boxes: For advanced materials, active filament dry dryers heat the spool before and during the printing process. This ensures continuous moisture removal during critical, multi-hour prints.

Elevate Your Printing Quality

Taking control of your material storage is an easy yet powerful step toward optimizing your overall 3D engineering capabilities. By protecting your spools from environmental humidity, you will reduce failed prints, save money on wasted plastic, and achieve flawless, professional-grade results every time you press print.

Continue Reading | ความคิดเห็น

3D Printing Explained: How 3D CAD Models Come to Life

Tuesday, September 22, 2026

Have you ever wondered how a digital file on your computer screen transforms into a solid, physical object you can hold in your hand? This is the magic of 3D printing. Formally known as additive manufacturing, this technology is revolutionizing everything from medical prosthetics to aerospace engineering. Let’s break down the fascinating process of how these machines work.

The Foundation: The Digital Blueprint

Every 3D-printed object begins its journey in the digital realm. To create a physical item, you first need a precise digital blueprint. This is where 3D CAD (Computer-Aided Design) software comes into play. Designers and engineers use these tools to create a detailed three-dimensional map of the object. This 3D CAD model serves as the essential set of instructions that tells the printer exactly what to build, ensuring every measurement is accurate to the millimeter.

From Design to Slices

Once the digital model is finalized, it cannot be sent directly to the printer just yet. It must first pass through a "Slicer." Slicing software takes the complex geometry of the model and cuts it into hundreds or thousands of thin, horizontal layers. It then generates "G-code," a specialized language that tells the printer’s motor where to move, how fast to go, and how much material to release.

The Printing Process: Building Layer by Layer

While traditional manufacturing often involves "subtractive" methods—like carving a statue out of a block of stone—3D printing is "additive." It builds objects by adding material one layer at a time.

The most common method for hobbyists is Fused Deposition Modeling (FDM). In this process, a plastic filament is fed into a heated nozzle called an extruder. The nozzle melts the plastic and moves with incredible precision, depositing a thin layer onto the build plate. Once a layer is finished, it cools and solidifies almost instantly, and the machine moves up to begin the next layer. This repetitive process continues until the entire object is completed.

Why It’s a Game Changer

The integration of 3D CAD technology with 3D printing allows for rapid prototyping. In the past, creating a prototype could take weeks and cost thousands of dollars in molds. Today, a designer can tweak a digital file and have a physical version ready in hours. Whether it’s creating custom jewelry or complex engine parts, 3D printing is limited only by the imagination of the designer.

Continue Reading | ความคิดเห็น

Popular Posts Today

 
Support : 3Dcadbrowser | Grabcad | 3Dcontentcentral | D | E | F | G
Copyright © 2028. Engineering 3DCad Appication - All Rights Reserved