Cad 3D Category

Showing posts with label Manufacturing. Show all posts

Mastering the Basics: A Beginner’s Guide to Engineering Drawing and Design

Wednesday, October 21, 2026
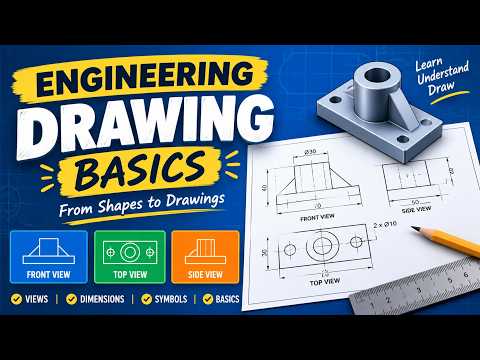
In the world of manufacturing and construction, clear communication is the foundation of every successful project. Before a single bolt is turned or a part is 3D printed, a concept must be translated into a technical format that anyone in the industry can understand. This is where Engineering Drawing comes into play. Often referred to as the "universal language of engineers," it provides the precise technical specifications needed to turn an abstract idea into a physical reality.

The Power of Orthographic Projections

One of the core pillars of any technical blueprint is the use of orthographic views. Unlike a standard 3D sketch, which can often distort the scale of an object, orthographic projection represents a three-dimensional object using several two-dimensional views. By analyzing the front, top, and side profiles, a manufacturer can understand the exact shape and proportions of a component with mathematical certainty. Mastering these views is the first step for any student or professional looking to excel in mechanical design.

Precision Through Dimensions and Symbols

A sketch becomes a professional Engineering Drawing when it incorporates standardized dimensions and geometric symbols. These elements are not just decorations; they are critical instructions. Dimensions tell the machinist exactly how large a part should be, while symbols communicate information about surface finish, tolerances, and material requirements. For a Quality Assurance (QA) specialist, these symbols are the "rulebook" used to determine if a finished part meets the necessary safety and functional standards.

Why It Matters for Your Career

Whether you are an aspiring Design Engineer or working in quality control, proficiency in Engineering Drawing is a non-negotiable skill. It ensures that the original design intent is preserved from the initial brainstorming phase all the way to final inspection. By understanding how to read and create these documents, you bridge the gap between creative design and practical production, reducing errors and saving time on the factory floor.

In conclusion, learning the basics of technical drafting is more than just a classroom exercise—it is an essential tool for anyone serious about a career in the mechanical and industrial sectors. By focusing on orthographic views and standardized symbols, you set yourself up for success in the evolving world of modern engineering.

Continue Reading | ความคิดเห็น

From 3D CAD Design to Finished Product: The Plastic Manufacturing Journey

Friday, September 11, 2026

Every innovative plastic component begins with a vision, typically brought to life as a digital prototype. But how exactly does a product transition from a 3D CAD file on a screen to a flawless, high-precision component ready for the market?

Whether you are developing parts for the automotive, electronics, or consumer goods industries, understanding the step-by-step journey from design to mass production is essential for optimizing manufacturing costs, component quality, and time-to-market.

Step 1: Optimizing the Design for Manufacturability

The transition begins with a thorough Design for Manufacturability (DFM) analysis. Expert engineers evaluate the original 3D CAD model to refine wall thickness, incorporate proper draft angles, and optimize gate locations. Identifying and fixing potential defects at this digital stage prevents costly tool modifications later in the production cycle.

Step 2: High-Precision Mold Creation

Once the digital blueprint is finalized, master toolmakers turn the software model into physical steel or aluminum tooling. Utilizing advanced CNC machining and EDM (Electrical Discharge Machining), high-precision molds are crafted to mirror the exact geometry of the intended part. Tooling precision here guarantees consistent quality across thousands—or even millions—of production cycles.

Step 3: The Injection Molding Process

With the custom mold clamped inside an industrial injection molding machine, the manufacturing process takes place in three quick phases: 1. Melting: Raw thermoplastic resin pellets are fed into a heated barrel and melted into a uniform liquid. 2. Injection: The molten polymer is injected under high pressure into the mold cavity, filling every intricate detail of the design. 3. Cooling & Ejection: The plastic rapidly cools and solidifies before ejector pins safely push the finished part out of the mold.

Step 4: Quality Assurance and Post-Processing

After ejection, components undergo rigorous quality checks to verify dimensional accuracy against the source file. Secondary operations—such as surface finishing, custom painting, or automated assembly—are then performed to meet strict industry standards.

Bring Your Vision to Life

Turning complex digital concepts into high-performance plastic parts requires expert tooling and precision molding capabilities. By partnering with specialist manufacturers in high-precision molds and plastic injection molding, businesses in the automotive, electronics, and consumer sectors can effortlessly transform their 3D CAD concepts into market-ready physical products.

Continue Reading | ความคิดเห็น

The Ultimate Guide to 3D CAD for Precision CNC Manufacturing

Sunday, August 23, 2026

In the fast-paced world of modern manufacturing, turning a rough concept into a high-precision physical component requires the right digital tools. Whether you are an experienced engineer, a machinist, or an enthusiastic hobbyist, mastering 3D CAD is the fundamental first step toward successful Computer Numerical Control (CNC) production.

From Digital Design to Physical Parts

Traditionally, manufacturing relied heavily on two-dimensional paper drawings, leaving plenty of room for interpretation and costly manual errors. Today, digital modeling software allows designers to construct virtual three-dimensional objects with microscopic precision.

These digital models serve as the master blueprint for modern machine tools. By converting solid geometries into machine-readable language (G-code), 3D CAD bridges the gap between creative design concepts and accurate physical manufacturing, ensuring every cut, drill, and pocket is executed perfectly.

Key Benefits of 3D CAD in Modern CNC Workflows

Integrating 3D modeling software into your manufacturing process offers several game-changing advantages:

  • Enhanced Visualization: Examine parts from every angle, inspect internal features, and verify proper fit within larger assemblies before cutting expensive raw material.
  • Reduced Material Waste: Simulate tool movements virtually to detect potential collisions, thin walls, or unreachable geometry early in the design stage.
  • Seamless CAM Integration: Effortlessly transfer your models directly into Computer-Aided Manufacturing (CAM) software to generate optimized toolpaths.

Tips for Creating Machine-Ready Designs

To ensure your digital drawings translate smoothly to the workshop floor, keep a few fundamental design rules in mind:

  1. Design for Tool Geometry: Standard CNC end mills are cylindrical. Always include internal radii on inside corners to accommodate round cutting tools.
  2. Maintain Reasonable Tolerances: Avoid over-specifying tight tolerances, as this significantly increases machining time and tool wear. Apply tight limits only where functional fit is critical.
  3. Optimize Wall Thickness: Keep structural integrity in mind. Extremely thin walls can vibrate or distort during the machining process under heavy cutting forces.

By incorporating robust 3D CAD practices into your product design workflow, you ensure higher manufacturing quality, faster project turnaround times, and lower overall production costs. Embrace modern digital modeling today to take your CNC projects to the next level!

3D CAD
Continue Reading | ความคิดเห็น

From 3D CAD to Reality: How 3D Printing Accelerates Product Development

Monday, August 17, 2026

In today’s fast-paced market, the ability to rapidly iterate on a design is what separates successful brands from the rest. The journey from a conceptual sketch to a tangible, functional product used to take months of back-and-forth with manufacturers. However, the integration of additive manufacturing has revolutionized this timeline, allowing designers to fail fast and innovate even faster.

The Foundation: Starting with 3D CAD

Before a single layer of material is printed, every great product begins in a digital environment. Using 3D CAD (Computer-Aided Design) software, engineers and designers can visualize complex geometries, test mechanical fitments, and ensure that every component works in harmony. This digital blueprint serves as the essential roadmap; without a precise model, the transition to a physical prototype would be impossible.

Choosing the Right 3D Printing Technology

Once your 3D CAD model is finalized, the next step is selecting the printing technology that best suits your goals. Not all 3D printers are created equal, and the choice depends on whether you need a visual model or a functional part:

  • FDM (Fused Deposition Modeling): The most common and cost-effective method, ideal for basic form testing and durable, low-cost structural parts.
  • SLA (Stereolithography): This technology uses a resin and a laser to create incredibly high-detail prototypes with smooth surface finishes, perfect for consumer electronics and jewelry.
  • SLS (Selective Laser Sintering): Utilizing a powder bed, SLS produces functional, end-use parts with high strength and heat resistance, often used for industrial applications.

Bridging the Gap to Production

3D printing bridges the gap between a digital file and a functional prototype. By utilizing 3D CAD data to create physical samples in-house, companies can identify design flaws early in the cycle, saving thousands of dollars in potential tooling costs. This iterative process allows for real-world testing, ergonomic evaluation, and stakeholder feedback long before the final production run.

Whether you are an individual inventor or part of a large engineering team, understanding the synergy between digital design and 3D printing is the key to turning your next big idea into a reality. By mastering these tools, you can ensure your product development process is as efficient and cost-effective as possible.

3D CAD
Continue Reading | ความคิดเห็น

Popular Posts Today

 
Support : 3Dcadbrowser | Grabcad | 3Dcontentcentral | D | E | F | G
Copyright © 2028. Engineering 3DCad Appication - All Rights Reserved