Cad 3D Category

Showing posts with label Interior Design. Show all posts

How to Create a Stunning Curved Reception Desk in SketchUp 3D Using NT UpSweep

Wednesday, October 14, 2026
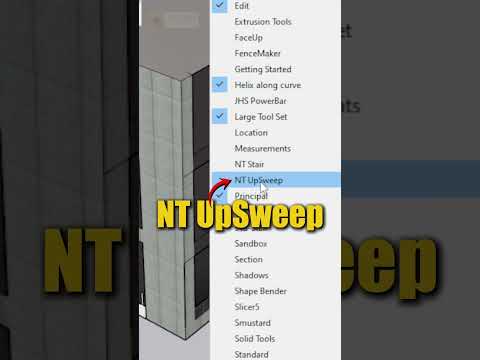
Designing modern interior furniture often requires mastering complex organic shapes that go beyond standard boxy geometry. If you are using SketchUp 3D for architectural modeling or interior visualization, creating smooth, sweeping surfaces can sometimes feel challenging. However, with the right extensions, transforming basic 2D lines into dynamic furniture becomes a fast and intuitive process.

In this guide, we will explore how to design an elegant, custom curved reception desk using the powerful "NT UpSweep" extension.

Why Use NT UpSweep for Curved Furniture?

Curved reception desks are a staple in commercial lobbies, luxury hotel reception areas, and modern office spaces. Standard push-pull methods in 3D modeling often struggle when handling sweeping elevations and complex compound curves simultaneously.

This is where the NT UpSweep tool shines. It enables designers to extrude profiles along custom curved paths while seamlessly adjusting height and sweep transitions. By leveraging this tool inside SketchUp 3D, you can save hours of manual tweaking while generating clean, professional geometry ready for rendering.

Step-by-Step: Modeling the Curved Reception Desk

  1. Draft the Base Footprint: Start by drawing the floor outline of your desk using arcs and curve tools to define the sweeping flow of the reception area.
  2. Define the Cross-Section Profile: Create a vertical profile of the desk structure, accounting for key ergonomic details like the countertop height, toe kick, and transaction ledge.
  3. Execute NT UpSweep: Select your base path and profile, then activate the NT UpSweep extension. The tool will automatically generate a continuous, fluid 3D form along your path.
  4. Detail and Materialize: Polish the model by applying textures—such as polished marble, warm wood veneers, or metallic accents—and adding integrated LED strip lighting for a photorealistic finish.

Elevate Your Interior Design Capabilities

Incorporating specialized plugins into your SketchUp 3D workflow allows you to overcome standard geometric limitations and push your creative boundaries. Tools like NT UpSweep empower you to focus on high-level design aesthetics rather than tedious technical execution. Try this method in your next interior project to deliver impressive, smooth organic structures that client presentations demand!

Continue Reading | ความคิดเห็น

How to Create Realistic Bedroom Interiors Using 3ds Max and D5 Render

Monday, October 12, 2026

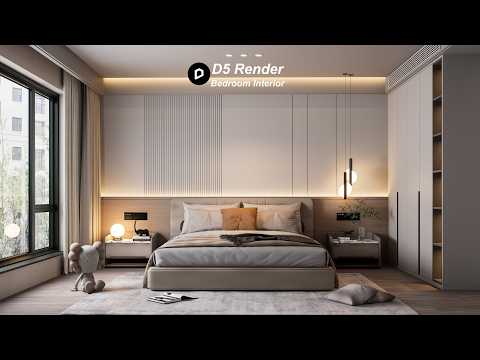
Creating photorealistic interior renders is an essential skill for modern 3D artists and interior designers. Whether you are building your geometry in 3ds Max or another modeling software, bringing your scene to life with realistic materials and lighting is where the real magic happens. In this guide, we will explore the step-by-step process of turning a bedroom scene into a breathtaking, lifelike rendering using D5 Render.

Step 1: Scene Preparation and Model Import

A convincing render begins with a well-detailed 3D model. High-poly assets—such as soft bedding, intricate light fixtures, and detailed furniture—add crucial realism to interior spaces. Once you have completed your initial architectural layout and furniture arrangement in 3ds Max, seamlessly export or sync the scene into D5 Render. Proper layering and material separation during the modeling phase will save you immense time during the texturing stage.

Step 2: Applying Realistic PBR Materials

Materials define how light interacts with your interior surfaces. To achieve maximum realism in a bedroom setting: - Fabrics & Linens: Use custom bump and normal maps to give blankets, pillows, and curtains tactile, soft textures. - Wood Surfaces: Apply high-resolution roughness maps to flooring and wooden furniture to capture realistic reflections and grain depth. - Glass & Metals: Fine-tune specular settings and metallic values on lamps, mirror frames, and window panes to create subtle specular highlights.

Step 3: Dialing in Natural and Artificial Lighting

Lighting makes or breaks interior visualization. Start by adjusting the sun direction to cast natural daylight through the bedroom windows. Soft skylight helps illuminate dark corners naturally without overexposing the scene. Next, add artificial light sources—such as warm spotlights near bedside lamps or subtle LED strips behind headboards—to add contrast, mood, and depth.

Step 4: Camera Setup and Final Output

To finish your bedroom visualization, adjust your camera angles to frame key design features. Set the focal length to mirror real-world architectural photography, avoiding unnatural lens distortion. Enable a subtle depth of field to draw focus to intricate design accents like decor pieces or fabric textures.

By pairing robust modeling techniques from 3ds Max with real-time rendering, you can create publication-ready bedroom interiors quickly and efficiently.

Continue Reading | ความคิดเห็น

Mastering Interior Design: How to Create a Stunning Living Area with SketchUp 3D

Thursday, October 1, 2026

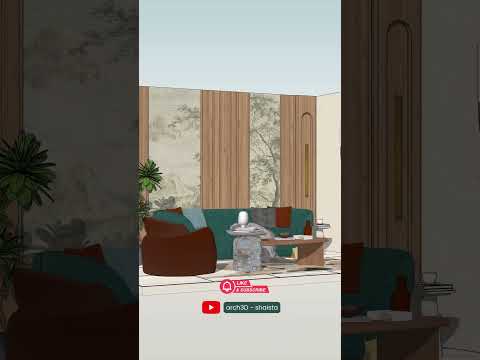
In the world of modern architecture and interior design, the ability to visualize a space before a single piece of furniture is moved is invaluable. Whether you are a professional designer or a DIY enthusiast, using SketchUp 3D has become the gold standard for turning abstract ideas into tangible, visual realities. Today, we’re diving into the process of creating a photorealistic living area that feels both cozy and professional.

The Foundation of Great Design

The journey begins with a solid model. A living area isn't just a box; it’s an ecosystem of light, space, and flow. By utilizing the intuitive tools within SketchUp 3D, you can quickly block out walls, windows, and doors to match real-world dimensions. The beauty of this software lies in its accessibility—you can move from a simple floor plan to a detailed 3D structure in a matter of minutes.

Once the shell of the room is complete, the focus shifts to the details. This is where you add character through furniture placement, decorative accents, and architectural moldings. A well-designed living room should balance aesthetics with functionality, and 3D modeling allows you to experiment with different layouts without any physical effort.

Bringing Realism with Textures and Lighting

A model is only as good as its finish. To truly impress clients or followers, you must bridge the gap between a digital sketch and a photorealistic image. This is where rendering engines like V-Ray come into play. By applying high-quality textures—such as grain-heavy wood for coffee tables or soft fabrics for sofas—you add layers of depth to your project.

Lighting is the final "secret ingredient." By simulating natural sunlight streaming through a window or the warm glow of an indoor lamp, you transform a flat model into a living, breathing space. Integrating these elements within your SketchUp 3D workflow ensures that your final render isn't just a picture, but an invitation into a home.

From Animation to Inspiration

Beyond static images, creating an animation of your living area model provides a cinematic experience. It allows viewers to "walk through" the space, feeling the scale and the atmosphere. By mastering these digital tools, you aren’t just drawing a room—you are storytelling. Start your next interior project today and see how digital modeling can elevate your creative vision to the next level.

Continue Reading | ความคิดเห็น

How to Create Precision Joinery Detail Drawings Using Rhino 3D

Wednesday, September 30, 2026

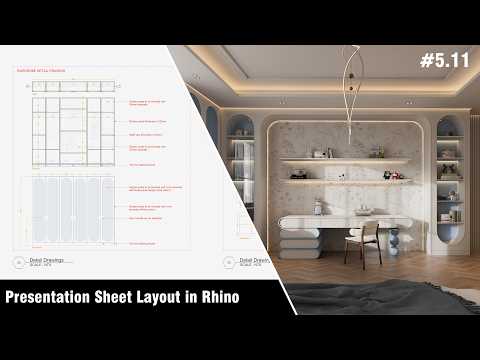
When designing custom interior spaces—especially specialized areas like a kids' bedroom—precision is everything. From built-in wardrobes to integrated study desks, custom joinery elevates a room from ordinary to extraordinary. To bridge the gap between initial design concepts and actual fabrication, creating accurate technical drawings is essential. This is where Rhino 3D shines as an indispensable tool for architects, furniture designers, and interior specialists.

Why Precision Joinery Details Are Crucial

Detailed joinery drawings serve as the ultimate communication bridge between designers, clients, and woodworkers. When designing a kids' bedroom, key furniture pieces such as wardrobes, study tables, and open shelving require meticulous planning. Detail drawings clarify exact measurements, material thicknesses, joinery connections, and hardware placement. Without these explicit technical details, installers are left guessing, which often leads to costly errors and delays on-site.

Modeling Custom Bedroom Furniture Step-by-Step

Using Rhino 3D, designers can draft both 2D drawings and 3D joinery components with incredible geometric accuracy. In a typical kids' bedroom project, your detailed drawing workflow will usually focus on three core elements:

  • The Wardrobe: Planning outer framing, door hinges, interior drawer runners, and hanging space.
  • The Study Table: Setting ergonomic desk heights, cable management pass-throughs, and structural leg joinery.
  • Wall Shelving Units: Specifying concealed mounting hardware, load-bearing capacities, and clean edge banding.

Drafting these components at a professional fabrication level ensures that carpenters understand the exact assembly methods and material specifications required for the build.

From Technical Drafting to Photorealistic Rendering

Beyond creating standard 2D shop drawings, leveraging Rhino 3D allows you to seamlessly transition into high-quality 3D visualization. By pairing your detailed Rhino models with modern real-time rendering engines like D5 Render, you can produce photorealistic visuals alongside your technical construction documents.

This dual approach not only helps clients visualize the finished space, but it also gives contractors absolute clarity on how the custom joinery should look and perform in real life. Mastering detailed joinery drawings will elevate your interior design workflow, giving you complete confidence from initial draft to final installation.

Continue Reading | ความคิดเห็น

Master Your 3D CAD Projects: How to Save and Export in Sweet Home 3D

Saturday, August 29, 2026

Designing a dream home or interior layout is an exciting process, but sharing your vision with clients, contractors, or friends requires the right output formats. While advanced 3D CAD software often comes with a steep learning curve, Sweet Home 3D makes spatial design accessible to everyone. Once your layout is complete, knowing how to properly save and export your project is key to bringing your ideas to life.

In this guide, we will walk you through how to export your floor plans as crisp PDFs, high-resolution rendered images, and dynamic video walkthroughs.

Exporting Crisp PDF Floor Plans

Whether you need physical prints for a construction team or a digital blueprint for a quick client review, exporting your project to PDF is essential. Sweet Home 3D allows you to easily format your 2D grid layout, insert precise measurements, and include detailed furniture lists before saving. This step bridges the gap between quick digital modeling and practical construction, ensuring your spatial dimensions align perfectly with professional 3D CAD standards.

Rendering High-Quality Photorealistic Images

Static 2D plans are great for technical planning, but rendered 3D images are what bring your interior concepts to life visually. Sweet Home 3D offers built-in rendering tools that allow you to customize lighting conditions, shadows, lens attributes, and the time of day. By generating high-definition images of individual rooms, you can showcase materials, color schemes, and lighting setups with impressive clarity before making any real-world renovations.

Producing Immersive Video Walkthroughs

To truly showcase the flow of a house, a video walkthrough is unbeatable. Sweet Home 3D enables users to set customizable camera paths throughout the room layout, recording seamless 3D video tours. This feature transforms your design from a flat diagram into an interactive experience, giving viewers a realistic tour of the virtual property.

Final Thoughts

Mastering these export options ensures that your design workflow remains smooth and professional from start to finish. Whether you are using simple home design software or complex 3D CAD applications, presenting your floor plans through high-quality PDFs, realistic renders, and video tours will elevate your architectural presentations to the next level.

3D CAD
Continue Reading | ความคิดเห็น

Popular Posts Today

 
Support : 3Dcadbrowser | Grabcad | 3Dcontentcentral | D | E | F | G
Copyright © 2028. Engineering 3DCad Appication - All Rights Reserved