Cad 3D Category

Showing posts with label 3D Modeling. Show all posts

Mastering Architectural Visualizations: How to Create Exploded Isometric Views in ArchiCAD 3D

Monday, September 21, 2026

In the competitive world of architectural design, the ability to communicate complex spatial ideas clearly is what sets a professional apart. While standard floor plans and sections provide essential technical data, they often fail to capture the structural "story" of a building. This is where exploded isometric axonometries become an invaluable tool for any architect or designer.

By breaking down a project into its constituent layers—showing how the foundation, walls, and roof assemblies interact—you provide a depth of understanding that a single 3D render cannot achieve. In this guide, we explore how you can leverage the power of ArchiCAD 3D to create these stunning visual representations for your next project.

Why Use Exploded Axonometries?

An exploded view is essentially a technical "dissection" of your project. It allows clients and collaborators to see the vertical relationship between different floors and structural systems simultaneously. Using an exploded format helps highlight specific details, such as interior circulation or material transitions, without losing the context of the entire building.

Step-by-Step: Creating Your Exploded View

The beauty of working with ArchiCAD 3D is that you don't have to dismantle your actual BIM model to create these views. Instead, you can utilize the "3D Document" feature and the "Layers" system to organize your elements.

  1. Isolate Your Elements: Use the Marquee tool or Layer Combinations to select the specific parts of the building you want to display.
  2. Adjust the 3D Projection: Set your view to an Isometric Axonometry. This ensures that all parallel lines remain parallel, which is the hallmark of a professional architectural diagram.
  3. The "Lifting" Process: Instead of moving the actual model components (which would ruin your floor plans), many experts recommend using the "3D Document" settings to offset the visual representation of certain levels or using the "3D Styles" to distinguish between structural layers.
  4. Refine the Aesthetics: Once your exploded view is positioned, adjust your shadows and contours to give the drawing a clean, crisp look.

Enhancing Professionalism with ArchiCAD 3D

One of the most significant advantages of using ArchiCAD 3D for these diagrams is the synchronization between your model and your visuals. If you change a wall thickness or a window position in your floor plan, your exploded isometric view can be updated automatically. This ensures that your artistic presentations remain 100% accurate to your technical documentation.

By mastering this technique, you can transform a standard presentation into an immersive visual experience that clearly demonstrates your design intent and technical expertise.


Continue Reading | ความคิดเห็น

Mastering the Blade: My Journey Modeling Roronoa Zoro’s Katanas in Blender 3D

Sunday, September 20, 2026

For any fan of One Piece, Roronoa Zoro isn’t just a character; he is a symbol of discipline, strength, and the legendary Santoryu (Three-Sword Style). As a 3D artist, there is no greater challenge than taking these iconic weapons—Wado Ichimonji, Sandai Kitetsu, and Enma—and bringing them to life in a digital space. Recently, I embarked on a personal marathon to recreate all of Zoro's swords to test my technical limits and refine my workflow.

The Challenge of the Three-Sword Style

Modeling a katana might seem simple at first glance, but the complexity lies in the details. Each of Zoro's blades carries a distinct personality. From the elegant, minimalist design of the Wado Ichimonji to the flame-like hamon patterns on Shusui, every element requires precision. This project wasn't just about making "cool swords"; it was about practicing hard-surface modeling, understanding curves, and mastering the art of the tsuba (handguard) design.

Why Blender 3D was the Perfect Tool

To achieve the level of detail necessary for these legendary blades, I relied heavily on Blender 3D. The software’s versatility allowed me to switch seamlessly between poly-modeling the blade's edge and sculpting the intricate wraps on the hilt. Using Blender 3D, I was able to experiment with different modifiers to ensure the curvature of the blades remained consistent and realistic, mimicking the traditional forging process of a real katana.

Bringing the Steel to Life

The real magic happened during the texturing and shading phase. A sword is only as good as its steel, and capturing the reflective properties of high-carbon metal was a lesson in material nodes. I focused on creating custom shaders that highlighted the unique temper lines of each blade. By utilizing the Eevee and Cycles engines within Blender 3D, I could visualize how light would dance off the edge of the Santoryu blades, giving them a cinematic feel that does justice to the source material.

Final Reflections

This project was more than just a fan-art tribute; it was a deep dive into the "true learning" of 3D art. It taught me that growth happens when you stop following tutorials step-by-step and start applying those techniques to a subject you are passionate about. Whether you are a beginner or a seasoned artist, pushing your boundaries with a complex project like this is the fastest way to sharpen your skills.

Stay tuned as I continue to explore the intersection of anime and digital art, one vertex at a time!

Continue Reading | ความคิดเห็น

Master SolidWorks 3D: Converting 2D Drawings into Professional 3D Models

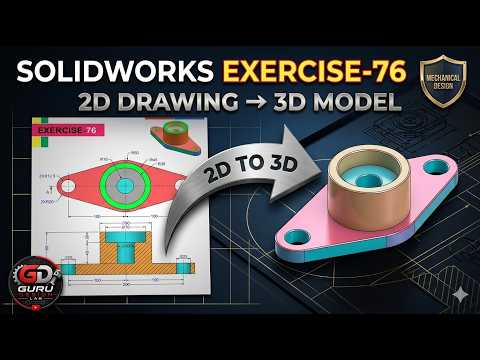
In the world of mechanical engineering and industrial design, the ability to interpret a flat, two-dimensional blueprint and transform it into a functional digital prototype is a vital skill. Today, we are diving deep into Exercise 76 from Guru Design LAB, where we explore how to harness the power of SolidWorks 3D to create complex mechanical parts with precision and efficiency.

The Bridge Between 2D Sketches and 3D Reality

The transition from a 2D drawing to a 3D model is where the magic happens. For many beginners, looking at a technical drawing filled with dimensions, hidden lines, and center marks can be intimidating. Exercise 76 simplifies this process. By breaking down the part into its fundamental geometric shapes, you can plan your modeling strategy before you even place your first sketch relation.

In this tutorial, Guru walks you through the essential workflow of identifying the primary plane, establishing the base feature, and layered additions. Using SolidWorks 3D allows for a parametric approach, meaning any change you make to your initial 2D sketch will automatically update your final model, ensuring accuracy throughout the design cycle.

Step-by-Step Modeling Strategy

The process begins with a robust base sketch. In Exercise 76, we focus on utilizing the Extruded Boss/Base feature to give our 2D shapes volume. Key highlights of this session include:

  1. Sketching with Constraints: Learning how to use relations like "Coincident" and "Tangent" to keep your model fully defined.
  2. Feature Application: Moving beyond simple extrusions to include cuts, holes, and fillets that define the part’s mechanical utility.
  3. Refining the Geometry: Using tools like the Hole Wizard to ensure that the mechanical specifications of the part meet industry standards.

Why Structured Practice Matters

Consistency is the secret to becoming a proficient designer. By following structured tutorials like this one, you learn more than just which buttons to click; you learn the logic behind professional part design. Mastering SolidWorks 3D through these exercises ensures that you can handle real-world engineering challenges, from simple brackets to complex machinery components.

Whether you are a student looking to sharpen your skills or a professional seeking a quick refresher, Exercise 76 provides a comprehensive look at the modern CAD workflow. Remember, every complex machine started as a simple sketch—it’s time to bring your designs to life!

Continue Reading | ความคิดเห็น

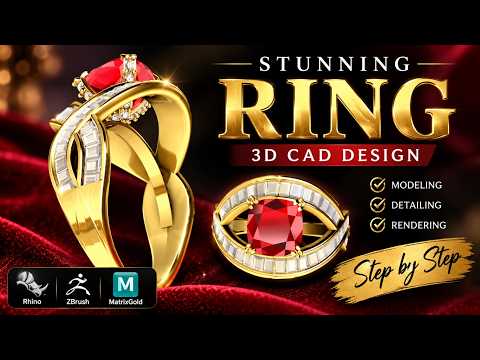
Mastering Jewelry CAD: Creating a Stunning Baguette Twin Shank Ring with Rhino 3D

Jewelry design has entered a new era of precision and creativity thanks to advanced digital tools. One of the most elegant designs to master is the Baguette Twin Shank Ring—a piece that combines architectural symmetry with the timeless brilliance of step-cut diamonds. In this guide, we explore the intricate process of bringing this sophisticated vision to life through professional CAD techniques.

The Architecture of the Twin Shank

The beauty of a twin shank ring lies in its structural complexity. Unlike a traditional single band, the twin shank requires a delicate balance to ensure both bands flow harmoniously toward the center setting. The process begins with establishing the base finger rail and sweeping the profiles. Precision is key here; the gap between the shanks must be consistent to maintain the "light" and "airy" aesthetic that makes this style so popular in modern fine jewelry.

Setting Baguette Stones with Rhino 3D

Baguette diamonds demand a high level of accuracy because of their straight edges and specific geometric proportions. Using Rhino 3D, designers can meticulously align each stone within the channel or prong setting. This software allows for the exact calculation of metal thickness and stone spacing, ensuring that the final cast piece requires minimal manual cleanup. When working with twin shanks, the transition point where the stones meet the dual bands is the most critical area to refine, requiring a smooth surface flow to ensure wearer comfort.

Pro-Tips for a Flawless Workflow

To elevate your jewelry design game, focus on your Boolean operations and history-enabled modeling. By utilizing the robust toolset available in Rhino 3D, you can create parametric-like adjustments. For instance, if you decide the baguette stones need to be slightly larger or the shank needs a different taper, having a clean, organized workflow allows you to make these changes without rebuilding the entire model from scratch. Always remember to check your tolerances for 3D printing; a design that looks flawless on the screen must also be structurally sound for casting in gold or platinum.

Conclusion

The Baguette Twin Shank Ring is a testament to how modern technology meets traditional craftsmanship. Mastering this specific style will not only sharpen your technical skills but also expand your design repertoire for high-end clients. By combining artistic vision with the power of digital modeling, the possibilities for innovation are endless.

Continue Reading | ความคิดเห็น

Mastering Digital Creation: Why Maya 3D is the Industry Standard for Artists

Saturday, September 19, 2026

In the rapidly evolving world of digital media, one software package stands out as the ultimate powerhouse for professionals: Maya 3D. From blockbuster Hollywood films to top-tier AAA video games, this comprehensive suite from Autodesk has become synonymous with high-end visual effects, complex character animation, and stunning digital environments.

The Versatility of Professional Modeling

Whether you are an aspiring artist or a seasoned professional, the modeling capabilities found within this software are unparalleled. It provides a robust set of tools for polygonal, NURBS, and subdivision surface modeling. Its ability to handle intricate details while maintaining a streamlined workflow allows artists to bring even the most complex concepts to life. With features like the integrated Modeling Toolkit and advanced UV mapping, the transition from a simple primitive shape to a hyper-realistic character is smoother than ever. Using Maya 3D allows for a level of precision that is essential for modern CGI production.

Industry-Leading Animation and VFX

Beyond static models, the real magic happens when things start to move. The platform is widely regarded as the gold standard for character rigging and animation. Its sophisticated physics engines and procedural toolsets allow for the creation of breathtaking effects—from realistic water simulations to complex motion graphics. For VFX artists, the software offers a deep level of control over lighting, shading, and rendering, ensuring that every frame meets the highest cinematic standards.

Getting Started on Your Creative Journey

Learning a tool this powerful can seem daunting at first, but the rewards are well worth the effort. The community surrounding the software is vast, offering countless tutorials and resources for those looking to sharpen their skills. By mastering the fundamentals of the interface and understanding the core production pipeline, you can open doors to career opportunities in film, gaming, and architectural visualization.

If you are ready to push the boundaries of what is possible in the digital realm, embracing the tools provided by Maya 3D is the definitive first step toward becoming a world-class creator. Whether you are interested in shorts, feature films, or interactive media, the power to create is at your fingertips.

Continue Reading | ความคิดเห็น

Popular Posts Today

 
Support : 3Dcadbrowser | Grabcad | 3Dcontentcentral | D | E | F | G
Copyright © 2028. Engineering 3DCad Appication - All Rights Reserved